
1. Plan your design
I usually design as I go, but you can sketch your shapes first, and then draw it on your canvas. I recommend starting with your thickest rope, then medium, and then using the thinnest one to fill in the spaces around.
2. Start gluing!
Start with the thickest one - you may want to put your glue down in sections. Start with one end of the rope on the edge of the canvas, and don't cut the other end to the exact lenth you need it until you are close to the end of gluing it down. Sometimes the thicker rope needs some glue it the twist, to keep it from un-twisting - but maybe you want the end a little frayed. It's your choice!
3. Filling in with the thinner rope
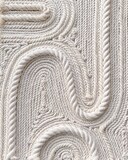
There are many ways you can fill in the open spaces. I will explain 2. You can either fill in by creating vertical/horizontal lines back and forth in the space. Or, you can go around the space and "outline" it with rope and keep going around inside it to fill it in. Then you end with a rope end in the center of the space. The first method, your ends may be a little more hidden.
4. Trim Ends
Trim any ends and you're done! So easy, and fun to do.
Links: Thick Rope, Thin Rope, Rechargeable Hot Glue Gun, Canvas
Check out my Makerplace by Michael's Studio.